Paint is the lifeblood of all artistic endeavours. It gives life to blank canvases, fills empty walls with colour, and bestows a charm to our daily surroundings. But what happens when your paint becomes watery, hindering your artistic vision and the quality of your work? Fret not, as we have gathered all the essential information and tested techniques you need to know about transforming your watery paint back into its optimal state.
Understanding the Problem: What Causes Watery Paint?
Paint, whether oil-based or water-based, tends to separate when left unused for an extended period. The separation of the paint can lead to a watery consistency, with solid components settling at the bottom and the liquid rising to the top. Other factors that might contribute to your paint turning watery include:
- Age of the Paint: Older, expired paint has a higher likelihood of becoming watery or liquid. Water-based acrylic and latex paints can last unopened for up to 10 years, and once opened, can serve you for another two years when stored properly. Oil-based paints, on the other hand, which contain dicarboxylic acids, have an unopened shelf life of 15 years, and once opened, can be used for about a year.
- Storage Conditions: The conditions under which your paint is stored can significantly affect its consistency. Paint should be stored tightly sealed in a cool, dry place to maintain its quality.
- Quality of Paint: Sometimes, you might just have gotten a poor batch of paint, or the paint could have been improperly stored by the retailer.
Understanding these causes can help you prevent watery paint in the future and aid in your efforts to restore it.
What Does It Mean When Your Paint is Watery?
The bottom line is that watery paint is unusable. So if your paint is too watery and you attempt to use it to paint your home, you will notice that the paint won’t adhere to surface correctly. It will be ‘thin’ and therefore will perform poorer than expected. The colour of the paint will be weak and you may find run lines appear as dripping is a common side-effect of watery paint.
Your first thought may be to dash to the hardware store and buy a brand-new tin of paint. However, the good news is that it is very possible to thicken watery paint in a cost-effective and efficient manner.
How Do You Thicken Watery Paint?
You’ll need to thicken your watery paint before you can begin to use it. There are a number of ways to do this and they vary in terms of cost and time commitment required. We’ll take a closer look at these methods below.
Step-by-Step Guide: How to Fix Watery Paint
Here, we delve into an array of tried and tested methods that you can employ to thicken your paint and return it to the ideal consistency.
Stir or Shake the Paint
Time: 5 minutes
Cost: No cost
Difficulty: Very easy
Preservation of original colour: No change
The simplest way to tackle watery paint is to stir it if it’s in a can or shake it if it’s in a bottle. The aim is to reintegrate the solid and liquid components of the paint that might have separated over time. Employ a long wooden stirrer for cans of paint, or consider using mixing balls for a more thorough blend. Remember, patience and thoroughness are the key to a successful stirring or shaking process.
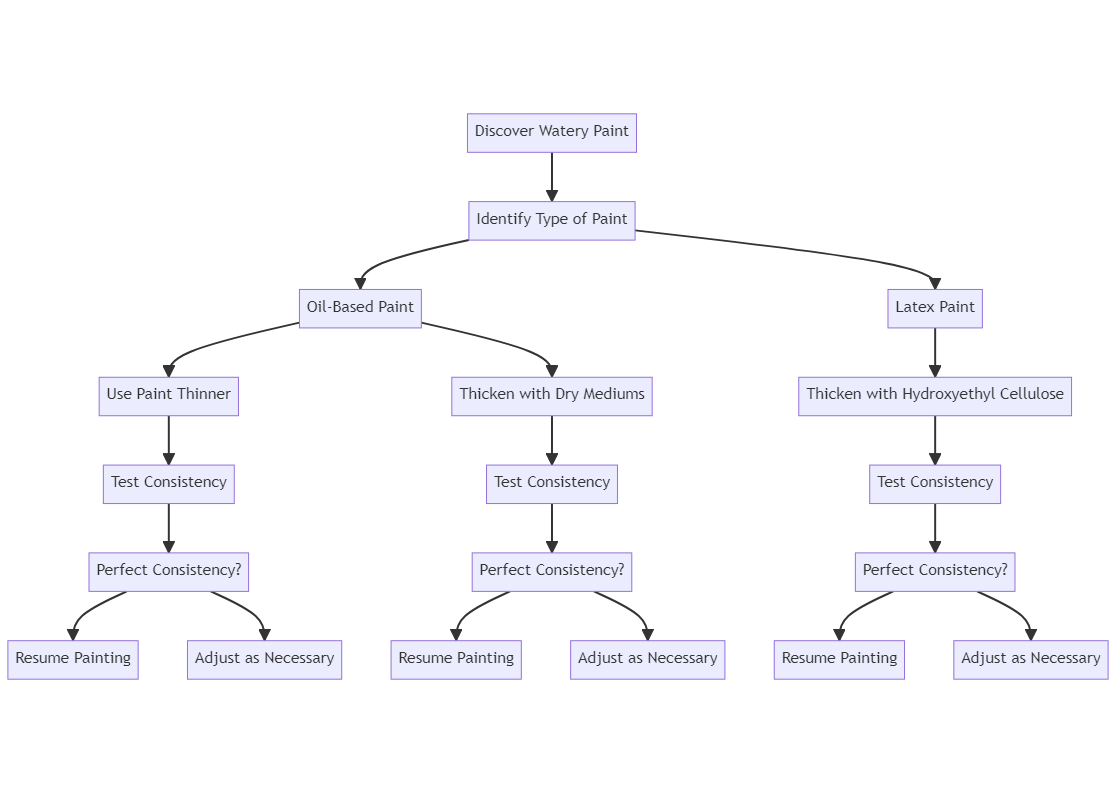
Use Paint Thinner for Oil-based Paints
Time: 15 minutes
Cost: $10
Difficulty: Moderate
Preservation of original colour: High
If you’re dealing with oil-based paint that has turned watery, a counterintuitive solution might lie in paint thinner. While it may seem contradictory to add thinner to already watery paint, it can help break down thick chunks of paint, creating a uniformly even mixture.
Here’s how you use a paint thinner:
- Transfer your paint into a dedicated container.
- Add 1 part paint thinner to every 3 parts of paint.
- Mix the paint thoroughly.
- Test your paint on a flat surface. If the consistency is still not ideal, add more paint thinner and mix again.

Thicken Your Paint
If stirring or thinning doesn’t solve the issue, the next step is to thicken your paint using specific agents.
For Latex Paints:
Use hydroxyethyl cellulose to thicken watery latex paint.
Time: 15 minutes
Cost: $30 to $90 for hydroxyethyl cellulose
Difficulty: Moderate
Preservation of original colour: High
Follow these steps:
- Transfer your watery paint into a large enough bucket to allow room for the paint thickener.
- Gradually add hydroxyethyl cellulose to the paint, stirring and observing the thickness as you go along. The hydroxyethyl cellulose should not exceed ¼ of the total volume of paint.
- Continue the process until you achieve the desired consistency.
For Oil Paints:
Time: 5-10 minutes
Cost: $10 maximum
Difficulty: Moderate
Preservation of original colour: High, but can be affected by overuse of mediums.
If your oil paint is thin and watery, consider these methods:
- Lay Multiple Layers: This technique helps reduce the translucent, watery look by adding depth and thickness to the paint layer.
- Add Dry Mediums: Improve your paint’s texture by adding dry mediums like sand, marble dust, or pastes. Start with a small amount and gradually increase until you reach the preferred consistency. Be aware that some mediums might change the paint’s visual texture.
You can also use a mixture of beeswax and turpentine, a solution often referred to as ‘paint wax’.
Time: 20 minutes
Cost: $15 for turpentine and beeswax
Difficulty: Difficult
Preservation of original colour: High
Beeswax, when mixed with turpentine, creates a paste that can add body to your oil-based paint, and here’s how to do it:
- Start by grating a block of pure beeswax into a container. The amount of beeswax required will depend on the volume of paint you need to thicken, but a good starting point is a quarter of the total volume of the paint.
- Next, pour turpentine into the container until the grated beeswax is just covered. Turpentine acts as a solvent in this mixture, breaking down the beeswax and helping it blend smoothly with the paint.
- Set the container in a larger pan filled with boiling water to create a makeshift double boiler. Allow the beeswax to melt slowly into the turpentine, stirring occasionally to help combine the ingredients. Once the beeswax has fully melted, you’ll be left with a thick, creamy paste.
- Allow this beeswax and turpentine paste to cool. Once cool, it can be mixed into your oil paint a little at a time until you reach your desired consistency. Be sure to mix thoroughly for even distribution.
Remember, a little goes a long way, so start small and add more if needed. It’s easier to add more of this mixture than to try to thin the paint again if it becomes too thick. This method is a safe and natural way to thicken your oil-based paints, but do ensure to work in a well-ventilated area as turpentine fumes can be strong.

Dispose and Replace
Should your paint have deteriorated beyond the point of no return, it’s important to consider environmentally friendly disposal options. Plenty of paint is left unused every year. In fact, in the US alone, approximately 750 million gallons of architectural paint goes to waste annually.
Disposing of your old paint isn’t as simple as tossing it in your regular trash bin, especially if you’re conscious of the environmental implications. In Australia, numerous programs facilitate paint recycling, offering you a safe, responsible way to dispose of your unusable paint.
One such initiative is Paintback, a national waste paint and packaging solution in Australia. Paintback is the first such national program in the world to be developed and voluntarily implemented by the paint industry. They accept a range of unwanted paint and packaging at their designated sites across Australia.
To use Paintback, ensure that your paint cans are sealed and not leaking. Keep in mind that they accept up to 100 litres per visit, packed into containers of 20 litres or less. Accepted products include interior and exterior architectural paint, deck coatings, floor paints, primers, undercoats, sealers, stains, shellacs, varnishes, urethanes (single component), wood coatings, and packaging.
If your paint is still usable but unwanted, consider donating it. The Bower’s Paint Reuse program in Sydney, for instance, accepts good quality, unused paint and provides it to community members and organizations for reuse.
By using these paint recycling programs, you’re not only responsibly disposing of your waste but also contributing to a more sustainable and environmentally friendly Australia. When the time comes to replace your paint, consider choosing brands committed to eco-friendly practices and quality. High-quality paint provides a better finish and reduces the likelihood of encountering issues like watery paint.
Learning from Experience: Choosing the Right Paint
Experience is the best teacher. After dealing with watery paint, you might have realised that some brands or specific colours from a particular brand are prone to turning watery. In such cases, it’s advisable to avoid these problematic paints in the future and opt for higher-quality alternatives that offer consistency and durability. There are plenty to choose from too; the US paints and coatings market alone was valued at $24.2 billion in 2019!
Happy Painting!
Dealing with watery paint can certainly be frustrating, but armed with the knowledge and techniques provided here, you can turn the tides and get your paint back to its ideal state. So grab your paintbrush, restore your paint, and let your creativity flow freely once again!

